在使用React-router时分别对应的是HashRouter和BrowserRouter
从名字上就可以知道了,对应的是前端中的 hash路由 和 history路由
区别
实现
其实不管是什么路由,都是基于一部分变化,然后根据新的路由渲染新的内容。
所以我们先定个小目标,要实现的内容:
监听路由变化,当路由变化做出不同动作。
可以配置路由。
HashRouter
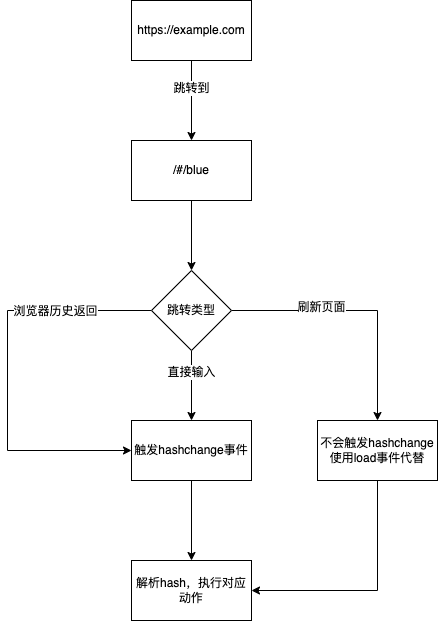
先来实现最简单的,只要客户端自己支持就好。hashRouter的底层依赖于url的hash变化的,hashchange事件可以满足我们的需求,那其实我们就加个监听事件就可以完成第一点。
| window.addEventListener("hashchange",()=>{
})
|
那要怎么实现可配置路由呢?也就是一个hash对应一个动作。
答案是Map,凑成形成[key,value]的键值对,key为router地址,value为回调也就是方法,每次添加一个路由,就是往map里放个键值对,然后hashChange的时候取出对应的方法,执行即可。
1
2
3
4
5
6
7
8
9
10
11
12
13
14
15
16
17
18
19
20
21
22
23
24
25
26
27
28
29
30
31
32
33
34
35
36
37
38
39
40
41
42
43
44
45
46
47
48
| class HashRouter {
constructor() {
this.routes = new Map();
this.refresh = this.refresh.bind(this);
this.route = this.route.bind(this);
window.addEventListener("hashchange", this.refresh);
}
route(path, cb) {
this.routes.set(path, cb);
}
refresh() {
const hash = window.location.hash;
const path = hash.slice(1) || "/"
if (path) {
const cb = this.routes.get(path);
cb && cb();
}
}
}
const router = new HashRouter();
const body = document.body;
function changeBgColor(color) {
body.style.backgroundColor = color;
}
router.route("/", () => {
changeBgColor("red")
})
router.route("/blue", () => {
changeBgColor("blue")
})
router.route("/grey", () => {
changeBgColor("grey")
})
router.route("/green", () => {
changeBgColor("green")
})
|
以上运行之后我们发现,/这个路由在刚进来的时候并未生效,所以我们取消这层注释就可以了,在刚进来的时候进行一次初始化操作。
historyRouter
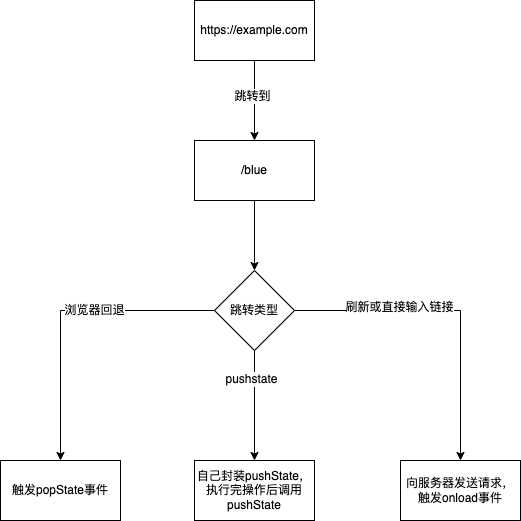
在写完hashRouter之后是不是觉得historyRouter就是把hashchange改一下就可以了?其实并不是,在官方API上查询可以看到,并没有监听pushState和replaceState的这种事件,只有popState的事件。
那我们就不监听事件好了,我们可以点击时阻止a标签的默认操作,然后拿到path,将path使用pushState更改浏览器的URL显示,最后从router这个map里取出来相应事件执行就好了。
1
2
3
4
5
6
7
8
9
10
11
12
13
14
15
16
17
18
19
20
21
22
23
24
25
26
27
28
29
30
31
32
33
34
35
36
37
38
39
40
41
42
43
44
45
46
47
48
49
50
51
52
53
54
55
56
57
58
59
60
61
62
63
64
65
66
67
68
69
70
71
72
73
74
| class HistoryRouter {
constructor() {
this.routes = new Map();
this.refresh = this.refresh.bind(this);
this.route = this.route.bind(this);
this.push = this.push.bind(this);
this.pop = this.pop.bind(this);
window.addEventListener("load", this.refresh);
window.addEventListener("popstate", this.pop);
}
route(path, cb) {
this.routes.set(path, cb);
}
refresh() {
const hash = window.location.hash;
const path = hash.slice(1) || "/"
if (path) {
const cb = this.routes.get(path);
cb && cb();
}
}
push(path){
const cb = this.routes.get(path);
cb && cb();
history.pushState({},{},path);
}
pop(){
const pathName = location.pathname;
const cb = this.routes.get(pathName);
cb && cb();
}
}
const router = new HistoryRouter();
const body = document.body;
function changeBgColor(color) {
body.style.backgroundColor = color;
}
router.route("/", () => {
changeBgColor("red")
})
router.route("/blue", () => {
changeBgColor("blue")
})
router.route("/grey", () => {
changeBgColor("grey")
})
router.route("/green", () => {
changeBgColor("green")
})
const handleClickLink = (e)=>{
e.preventDefault();
const pathName = new URL(e.target.href).pathname;
router.push(pathName);
}
document.querySelector("#green").addEventListener("click", handleClickLink)
document.querySelector("#grey").addEventListener("click", handleClickLink)
|